Amazon Connect AWS CDK

Amazon Connect is a cloud-based contact center service provided by Amazon Web Services (AWS). It allows businesses to easily set up and manage a contact center in the cloud, providing a flexible and scalable solution for customer support, sales, and service.

With Amazon Connect, businesses can create virtual contact centers that can handle voice, chat, and email interactions with customers. It provides a set of tools and features that enable businesses to create personalized customer experiences, while also improving agent productivity and efficiency.

Key features of Amazon Connect:

  • Interactive Voice Response (IVR): Enables customers to self-serve by navigating through menus and selecting options using their phone’s keypad or voice commands.
  • Automatic Call Distribution (ACD): Routes incoming calls to the appropriate queue or agent based on pre-defined criteria, such as skill set, language, or customer history.
  • Call recording and transcription: Records and transcribes calls for quality assurance and compliance purposes.
  • Real-time and historical analytics: Provides real-time and historical data about call center performance, such as queue metrics, agent activity, and customer feedback.
  • Integration with other AWS services: Integrates with other AWS services, such as Amazon S3, Amazon Kinesis, and Amazon Lex, to provide additional functionality and customization options.

To create routing profiles, phone numbers, and contact flows in Amazon Connect using AWS CDK, you can use the appropriate constructs provided by the aws-cdk-lib/aws-connect package.

Here’s an example CDK script that creates a routing profile, phone number, and contact flow:

//typescript
//
import * as cdk from 'aws-cdk-lib';
import * as connect from 'aws-cdk-lib/aws-connect';

const app = new cdk.App();

const stack = new cdk.Stack(app, 'AmazonConnectStack', {
  env: { account: '<your_aws_account_id>', region: 'us-west-2' },
});

// Define the Amazon Connect instance
const instance = new connect.CfnInstance(stack, 'MyConnectInstance', {
  identityManagementType: 'CONNECT_MANAGED',
  inboundCallsEnabled: true,
  instanceAlias: 'my-connect-instance',
  tags: {
    Name: 'My Amazon Connect Instance',
  },
});

// Define the routing profile
const routingProfile = new connect.CfnRoutingProfile(stack, 'MyRoutingProfile', {
  name: 'My Routing Profile',
  defaultOutboundQueueId: 'arn:aws:connect:us-west-2:<your_aws_account_id>:instance/<instance_id>/queue/<queue_id>',
  queueConfigs: [{
    priority: 1,
    queueReference: {
      id: 'arn:aws:connect:us-west-2:<your_aws_account_id>:instance/<instance_id>/queue/<queue_id>',
    },
  }],
});

// Define the phone number
const phoneNumber = new connect.CfnPhoneNumber(stack, 'MyPhoneNumber', {
  phoneNumber: '+1234567890',
  instanceId: instance.ref,
  productType: 'SIP',
  routingProfileId: routingProfile.ref,
  tags: {
    Name: 'My Phone Number',
  },
});

// Define the contact flow
const contactFlow = new connect.CfnContactFlow(stack, 'MyContactFlow', {
  name: 'My Contact Flow',
  type: 'CONTACT_FLOW',
  content: JSON.stringify({
    version: '13.0',
    start: {
      id: 'f33c6eeb-4131-470c-93d6-f8117f464a0a',
      type: 'Standard',
      branches: [],
      parameters: {},
    },
  }),
});

// Output the phone number ARN and contact flow ARN
new cdk.CfnOutput(stack, 'MyPhoneNumberArn', { value: phoneNumber.attrArn });
new cdk.CfnOutput(stack, 'MyContactFlowArn', { value: contactFlow.attrArn });

In this example, we define a routing profile using the CfnRoutingProfile construct, setting the name and default outbound queue. We also specify a priority and queue reference for the routing profile.

Next, we define a phone number using the CfnPhoneNumber construct, setting the phone number, instance ID, product type, and routing profile ID. We also set a name for the phone number using tags.

Finally, we define a contact flow using the CfnContactFlow construct, setting the name and content of the contact flow. We also output the ARNs for the phone number and contact flow using the CfnOutput construct, allowing us to easily access them for use in other parts of our application.

By using AWS CDK to define and create these resources, we can ensure that our Amazon Connect infrastructure is created and configured in a consistent and repeatable way, making it easier to manage and maintain over time.
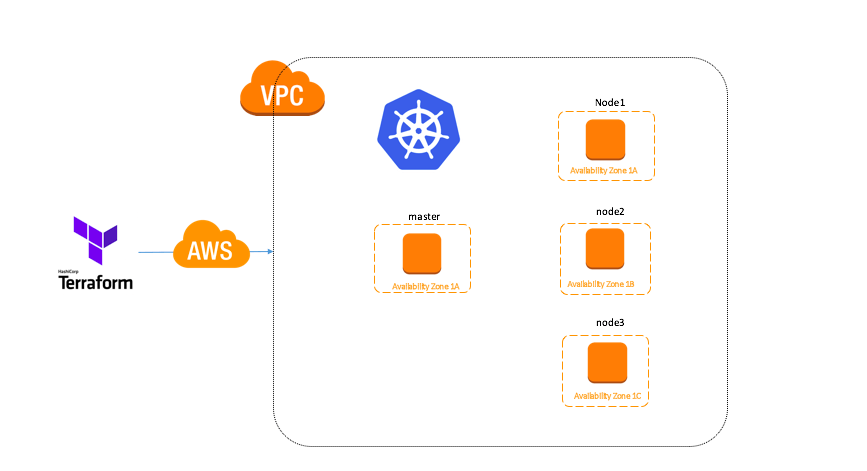
Kops AWS infra Automation


This example Project will help you to create KOPs cluster on multiple AZ but limited to the Single region.

Assume that you have AWS CLI installed and IAM user configured.

The IAM user to create the Kubernetes cluster must have the following permissions:

  • AmazonEC2FullAccess
  • AmazonRoute53FullAccess
  • AmazonS3FullAccess
  • IAMFullAccess
  • AmazonVPCFullAccess

Pre-requirements:

  1. Terraform (Note you need to install 0.11.7 Version) https://www.terraform.io/downloads.html
  2. Install kops (WE ARE USING kops 1.8.1 for now) https://github.com/kubernetes/kops

For Mac

brew update && brew install kops

OR from GITHUB

curl -Lo kops https://github.com/kubernetes/kops/releases/download/1.8.1/kops-darwin-amd64
chmod +x ./kops
sudo mv ./kops /usr/local/bin/

For Linux

wget -O kops https://github.com/kubernetes/kops/releases/download/1.8.1/kops-linux-amd64
chmod +x ./kops
sudo mv ./kops /usr/local/bin/
  1. Install kubectl https://kubernetes.io/docs/tasks/tools/install-kubectl/

For Mac

curl -LO https://storage.googleapis.com/kubernetes-release/release/v1.8.11/bin/darwin/amd64/kubectl
chmod +x ./kubectl
sudo mv ./kubectl /usr/local/bin/kubectl

For Ubuntu

curl -LO https://storage.googleapis.com/kubernetes-release/release/v1.8.11/bin/linux/amd64/kubectl
chmod +x ./kubectl
sudo mv ./kubectl /usr/local/bin/kubectl

Getting started

Replace with your public zone name

vim example/variables.tf
variable "domain_name" {
  default = "k8s.thoutam.com"
}

Edit cluster details. node_asg_desired,instance_key_name etc..

vim example/kops_clusters.tf

**** Edit module according to insfra name *****

module "staging" {
  source                    = "../module"
  source                    = "./"
  kubernetes_version        = "1.8.11"
  sg_allow_ssh              = "${aws_security_group.allow_ssh.id}"
  sg_allow_http_s           = "${aws_security_group.allow_http.id}"
  cluster_name              = "staging"
  cluster_fqdn              = "staging.${aws_route53_zone.k8s_zone.name}"
  route53_zone_id           = "${aws_route53_zone.k8s_zone.id}"
  kops_s3_bucket_arn        = "${aws_s3_bucket.kops.arn}"
  kops_s3_bucket_id         = "${aws_s3_bucket.kops.id}"
  vpc_id                    = "${aws_vpc.main_vpc.id}"
  instance_key_name         = "${var.key_name}"
  node_asg_desired          = 3
  node_asg_min              = 3
  node_asg_max              = 3
  master_instance_type      = "t2.medium"
  node_instance_type        = "m4.xlarge"
  internet_gateway_id       = "${aws_internet_gateway.public.id}"
  public_subnet_cidr_blocks = ["${local.staging_public_subnet_cidr_blocks}"]
  kops_dns_mode             = "private"
}

If you want Force single master. (Can be used when a master per AZ is not required or if running in a region with only 2 AZs).

vim module/variables.tf 

**** force_single_master should be true if you want single master ****

variable "force_single_master" {
   default = true
  }

ALl good now. You can run Terraform plan to see if you get any errors. If everything clean just run “terraform apply” to build cluster.

cd example
terrafrom plan

(Output something like below)
  ......
  ......
  
  + module.staging.null_resource.delete_tf_files
      id:                                                 <computed>


Plan: 6 to add, 0 to change, 1 to destroy.

------------------------------------------------------------------------
  
  ......
  ......

MASTER_ELB_CLUSTER1=$(terraform state show module.staging.aws_elb.master | grep dns_name | cut -f2 -d= | xargs)
kubectl config set-cluster staging.k8s.thoutam.com --insecure-skip-tls-verify=true --server=https://$MASTER_ELB_CLUSTER1

And then test:

kubectl cluster-info
Kubernetes master is running at https://staging-master-999999999.eu-west-1.elb.amazonaws.com
KubeDNS is running at https://staging-master-999999999.eu-west-1.elb.amazonaws.com/api/v1/namespaces/kube-system/services/kube-dns/proxy

kubectl get nodes
NAME                                          STATUS    ROLES     AGE       VERSION
ip-172-20-25-99.eu-west-1.compute.internal    Ready     master    9m        v1.8.11
ip-172-20-26-11.eu-west-1.compute.internal    Ready     node      3m        v1.8.11
ip-172-20-26-209.eu-west-1.compute.internal   Ready     node      27s       v1.8.11
ip-172-20-27-107.eu-west-1.compute.internal   Ready     node      2m        v1.8.11

Credits: Original code is taken from here.